How to upgrade an N2WS server from Ubuntu 22.04 to Ubuntu Pro

Before starting, make sure you know how to redeploy the server in case of issues during OS upgrade. In addition, Linux knowledge is Required.
There are additional costs charged by AWS when using Ubuntu Pro, see this link for pricing details.
 Warning: Do not cut and paste commands out of this KB article as it will cause the procedure to fail and you will need to rebuild the CPM instance.
Warning: Do not cut and paste commands out of this KB article as it will cause the procedure to fail and you will need to rebuild the CPM instance.Steps:
1. Take a backup of the cpmdata volume and read all the steps before starting.
2. Connect to N2WS server over SSH (user is cpmuser)
3. Switch to root user
sudo su -
4. Create a soft link to the system certs directory:
ln -s /etc/ssl/certs certs
5. Verify that new certs directory exist:
ls -laR | grep certs

NOTE: Please accept all defaults when prompted, failure to do so may cause failures that will require you to redeploy the instance.
6. Update ubuntu:
apt update
You should see a message similar to this if successful.
7. Upgrade ubuntu:
apt upgrade
8. If upgrade fails due
to an error /var/lib/dpkg/lock-frontend, find out which process is holding the
lock-frontend
sudo lsof /var/lib/dpkg/lock-frontend You can see the
process id under the PID column. Use this PID to kill the process. for example
sudo
kill -9 PID sudo rm
/var/lib/dpkg/lock-frontend
then Repeat update/upgrade commands.
9. Install pro client tool:
apt
install ubuntu-advantage-tools
10. Read the Ubuntu article on how to convert license to Pro: How to upgrade Ubuntu LTS to Ubuntu Pro on AWS using AWS License Manager
Below Steps are based on the article, they are here to help but not to replace the Ubuntu Article.
11. Go to the AWS Systems Manager and verify that the SMS agent from the CPM instance is listed in AWS Fleet Manager as a managed node.
If the CPM instance is not listed as a managed node then it may be necessary to restart the CPM instance or restart the ssm agent by running this command.
sudo snap restart amazon-ssm-agent
12. Before continuing you must stop the CPM instance in the AWS ec2 console . Select CPM instance and right click on it and select "stop instance".
13. Confirm the stoppage of the instance
14. Confirm the instance is totally stopped.
15. Please go to AWS License Manager and click on the Create license type conversion button.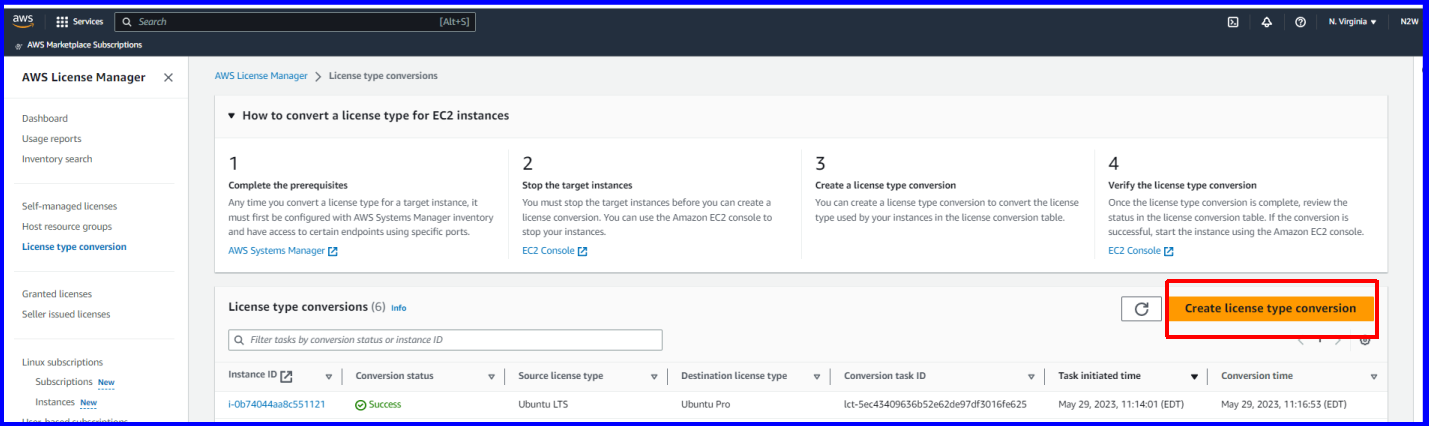
16. Select the source operating system, Ubuntu LTS and select the CPM instance in the available instances section, then click Next.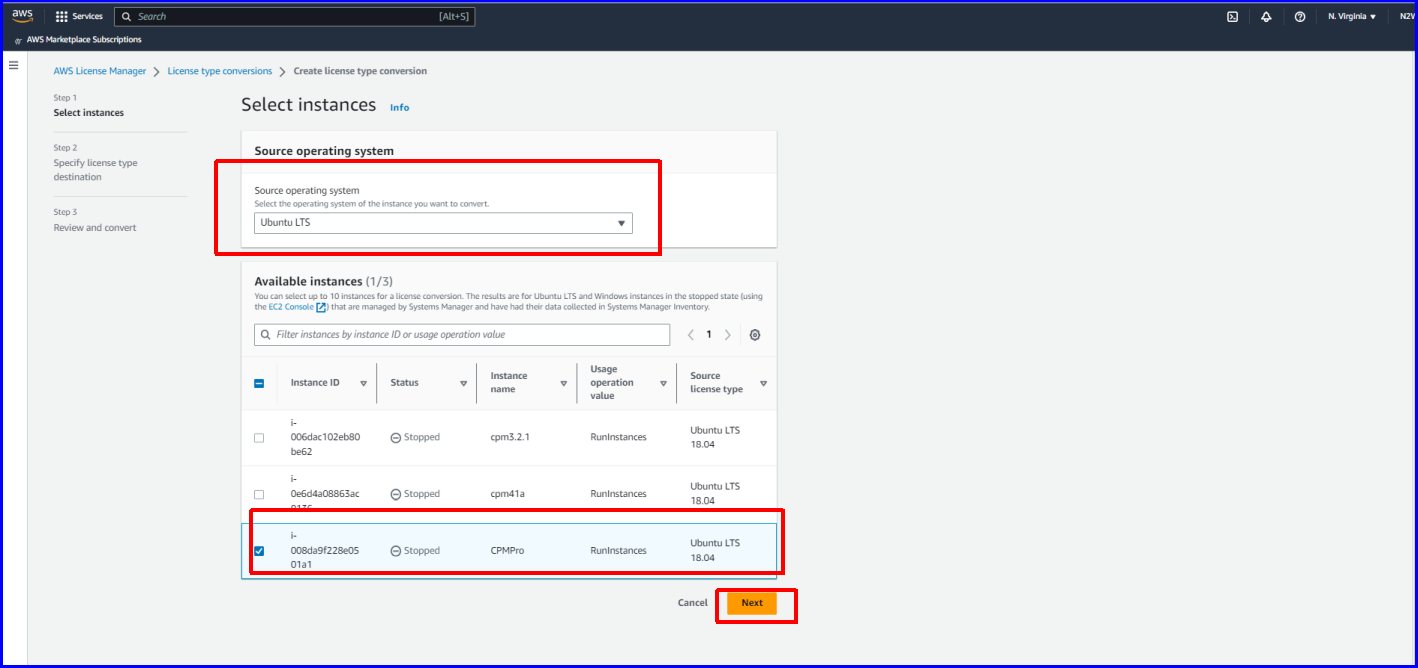
17. Make sure that in the Specify license type destination field that it has Ubuntu Pro selected and click the Next button.
18. Review and confirm the settings for the license conversion and click the Convert button.
19. You should get a notification that the conversion was successful. The CPM instance should also show up in the License Type conversion section and show Success.
20. Start the CPM instance in the AWS ec2 Console.
21. ssh into the CPM instance using the login cpmuser and then run the command
pro status
You should see the following enabled.
Related Articles
How to update the Ubuntu distribution on the CPM instance
Before starting it is recommended to take backup of cpmdata volume and be familiar with how to restore the server. In order to update the Ubuntu distribution on the CPM instance, you have to follow these instructions precisely (when no backup/DR is ...Upgrade instructions
This guide outlines the steps required to upgrade N2WS Backup & Recovery. We strongly recommend that you follow every step contained within this guide to ensure is done correctly and no data loss occurs. in addition to this article, we recommend that ...CPM Server upgrade may fail with the "Reason: The instance ID 'i-1234567890abcdef' does not exist" and "Configuration Failed" errors
CPM Server upgrade may fail with the "Reason: The instance ID 'i-1234567890abcdef' does not exist" and "Configuration Failed" errors: The reason for this failure is using wrong AWS Access Key and Secret Key - maybe they belong to the wrong account.Upgrade instructions for v2.7.0
This guide outlines the steps required to upgrade to N2WS Backup & Recovery version 2.7. We strongly recommend that you follow every step contained within this guide to ensure version 2.7 is configured correctly and no data loss occurs. Customers ...Upgrade fails with error "Could not mount the new volume, returned: 8192"
If you get this error message during an upgrade, it is very likely that the filesystem is corrupted on the CPMData Volume. Please perform these steps: 1) Connect to N2WS EC2 instance where the upgrade failed using user "cpmuser" and your Key 2) ...