Background:
The purpose of this document is to provide the best practices for upgrading the Cloud Protection Manager (CPM) instance to the latest version. The following procedure details the steps that are required to ensure that the upgrade is successful.
Prerequisites:
1. Take a snapshot in AWS EC2 of the CPMDATA volume.
2. Gather the important information you will need for the upgrade.
3. Make sure that there are no running backups or DR copy processes before continuing.
4. Terminate the existing CPM instance in AWS EC2 Console.
5. Launch a new instance of CPM from the AWS Marketplace.
Step 1. The first step in ensuring a successful upgrade of CPM is to have a backup copy of the CPM Data Volume.
The volume is typically named CPM Cloud Protection Manager Data.
The snapshot is only needed in the event there is a problem with the upgrade process and it can be deleted afterward.
A. Login into the AWS Console and got to EC2, go to the Volumes section in the AWS Management Console and locate the CPM data volume by filtering for “CPM”.
Note: This contains all configuration settings for CPM and the settings will be carried forward during the upgrade.
B. Then please right click on the volume and select Create Snapshot.
C. Give the snapshot a description that will make it easy to locate if needed.
D. You will get a message that the snapshot succeeded. Please click on the Close button.
Step 2. Gather the important information you will need for the upgrade.
Make sure you have the following information regarding your CPM environment.
a. AWS Availability zone or Virtual Private Cloud (VPC) that CPM currently resides in.
b. Have the login credentials for CPM root/admin account password which is used to login into the CPM Console with.
c. Know which AWS Role and or user account credentials that will be used to connect to AWS with.
d. Have access to the CPM’s private key If using backup scripts that utilize SSH, you may need to login to the CPM Server
once and run the scripts manually, so the use of the private key will be approved.
e.
Have access to any custom SSL Certificates you want to use with the new CPM
f. Know which edition of CPM you are running currently EG: Standard, Advanced, Enterprise,
Step 3. Please make sure that CPM is not actively backing up your instances or making DR copies before proceeding.
This can be confirmed in the Cloud Protection Manger’s backup Monitor screen.
Step 4. Terminate the existing CPM instance in AWS EC2 Console.
In the AWS EC2 Console locate the CPM instance and right click and select Instance state, then click on Stop and wait until its status is AWS EC2 console is stopped. Then right click and select Instance state, then click on terminate. Please wait until the instance shows a status of terminated in the AWS Console.
NOTE: Failure to properly stop and terminate the instance can cause the CPM upgrade to fail, or cause malfunction after the upgrade.
NOTE: All CPM configuration settings like policies, users, and account information are preserved in the CPMDATA Volume.
Step 5. Launch a new instance of CPM from the AWS Marketplace
Search for “Cloud Protection Manager" or "CPM "
Step 6. Please choose the correct version of CPM to upgrade.
Step 7. Please hit the Continue to Subscribe button.
8. Please hit the Continue to Configuration button.
Step 9. Please make sure you launch the new instance into the same AWS Region and Availability Zone, or the VPC that the previous instance resided.
Please make sure you choose the same size instance or a larger instance.
Under Fulfillment options, please choose Amazon Machine Image.
Please select under the Fulfillment Option “Amazon Machine Image” and make sure that the “64-bit Amazon Machine Image (AMI)” is selected.
Ensure that the field “Software Version” has the latest version of CPM selected. In this example “2.3.0e”. 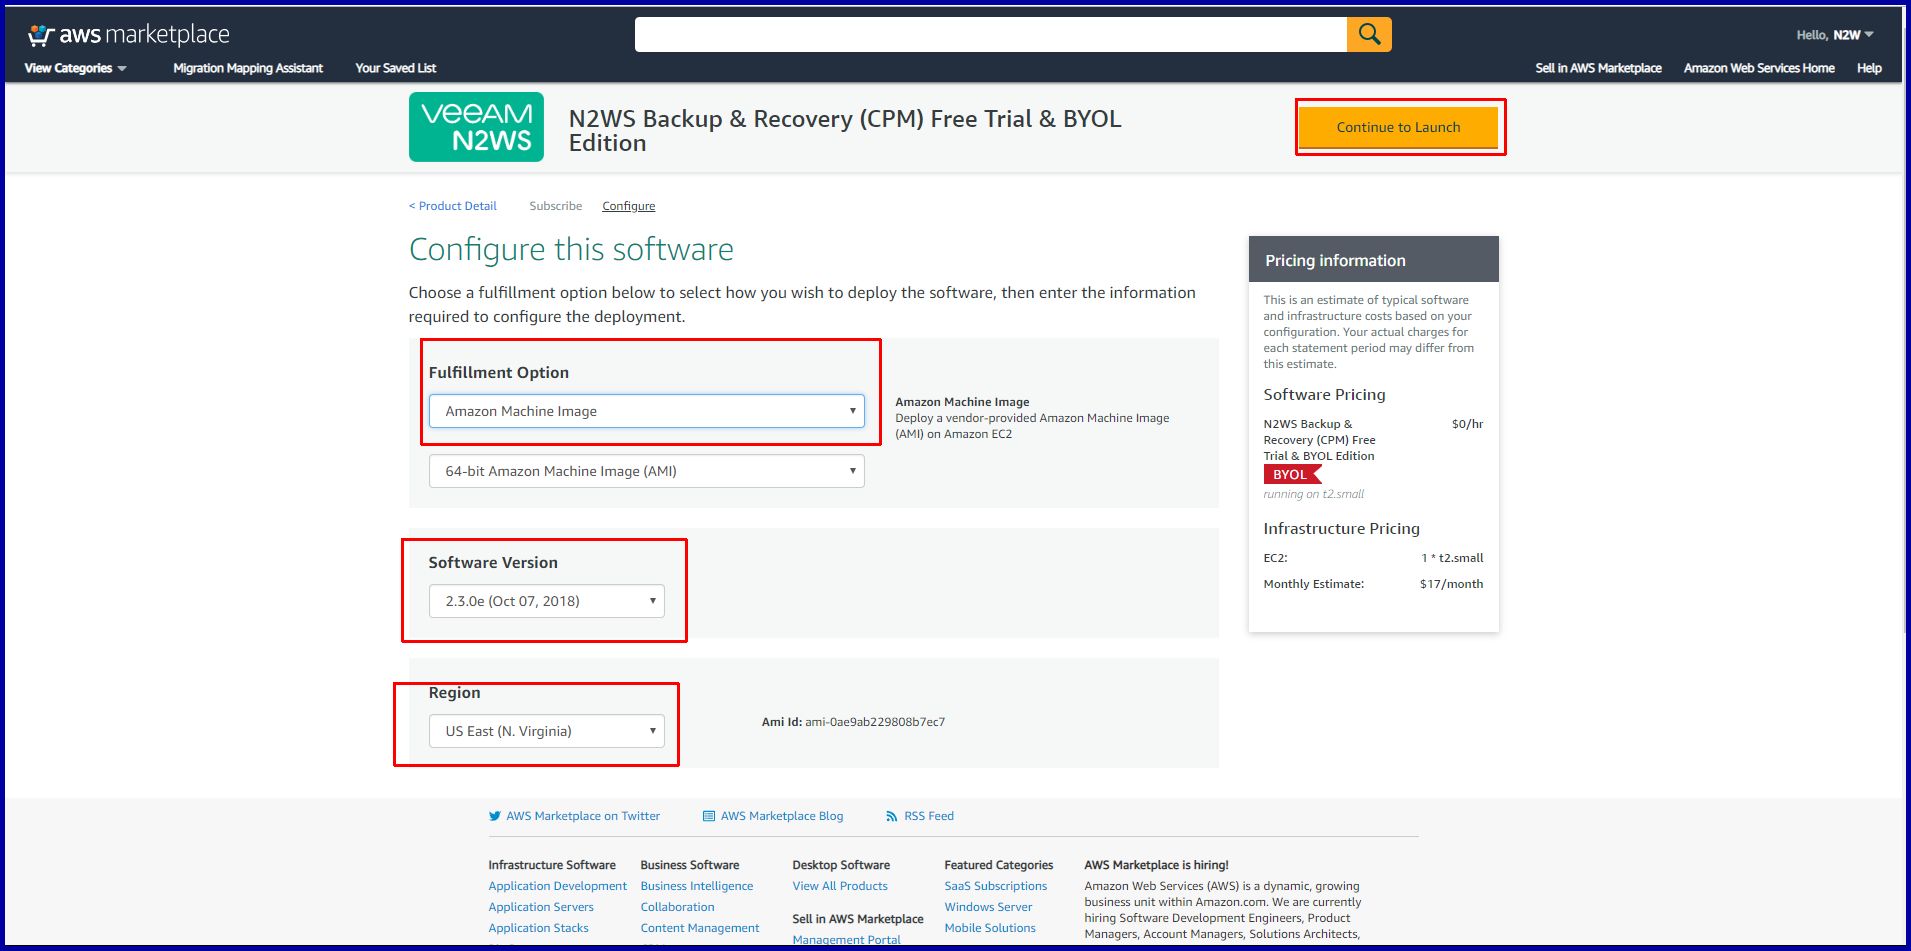
Step 10. Please click on the Continue to Launch Button.
Step 11. Please configure the following options as your current configuration of CPM and AWS dictates.
Choose Action: launch from Website:
EC2 Instance Type: Choose the instance type as what matches the instance you are upgrading.
VPC Settings: launch if applicable to the same VPC as where CPM resides currently.
Subnet Settings: If applicable select the correct subnetting information.
Security Groups: Choose the Security Group that the CPM instance is using.
Key Pair Settings: Please select the key pair for the CPM instance
When all this is configured and verified to be correct please hit the Launch button at the bottom of the page.
Step 12. You will see a message that an instance of this is software is successfully deployed on EC2!
Step 13. Please navigate to the EC2 Console and under EC2, please select Instances, you should see the newly deployed CPM Instance. Please wait until it passes both AWS Status checks.
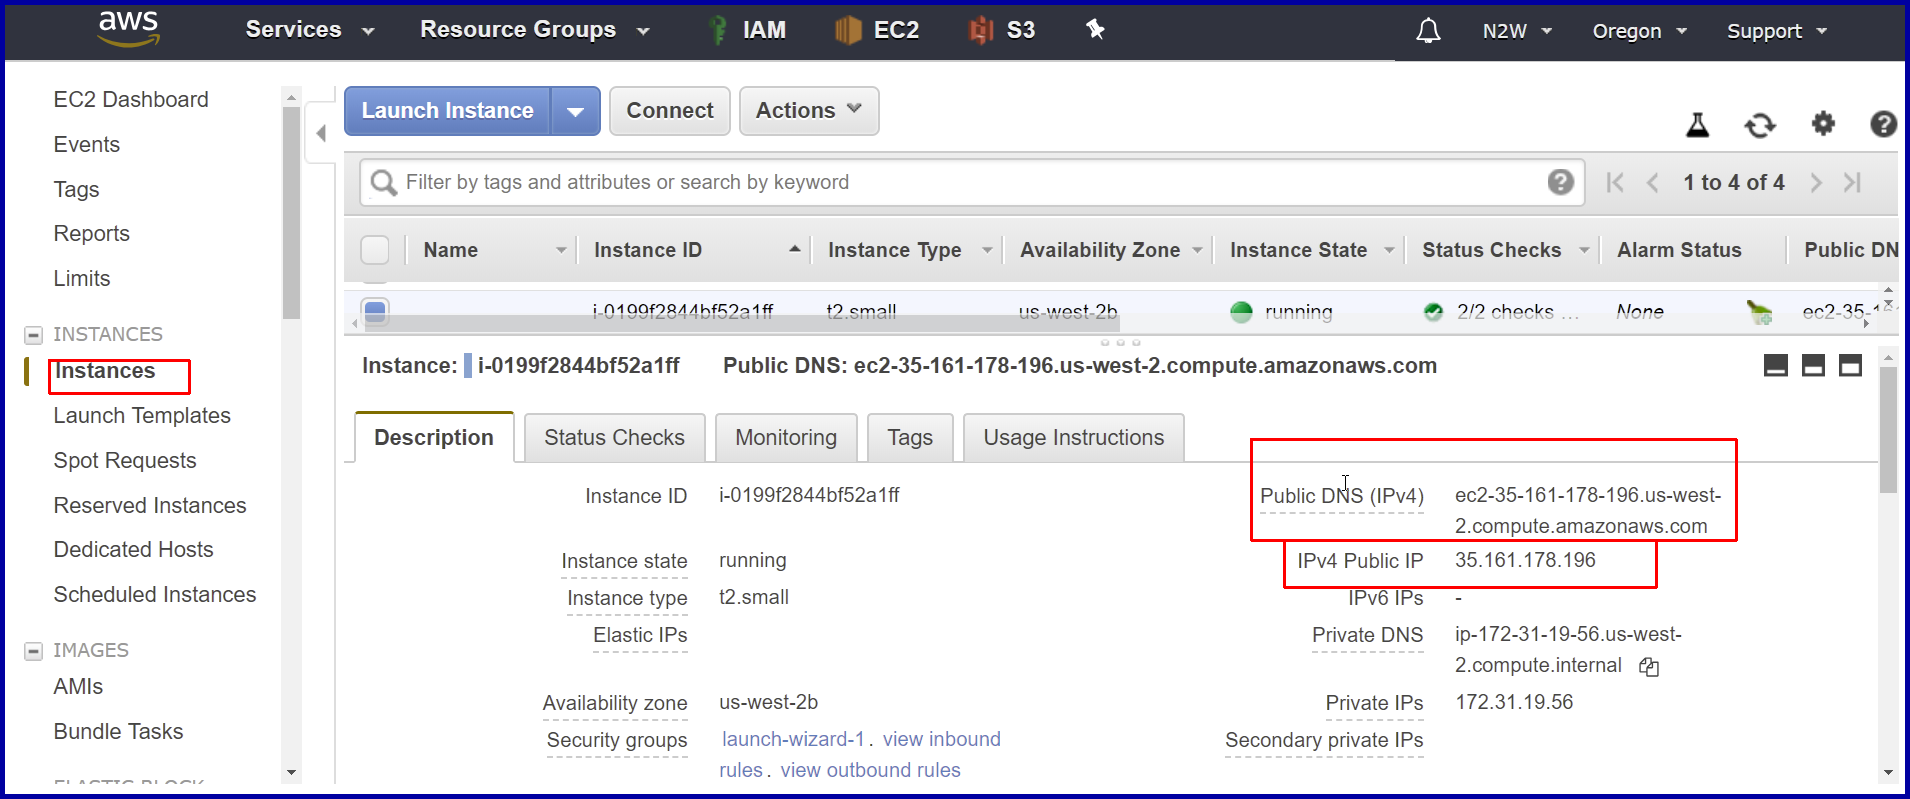
Step. 14 Please locate the newly launched instance in the EC2 console. Then look under the properties and note the hostname/IP address. You will need this information to connect to CPM Server using your web browser.
Step 15. Then open a web browser and navigate to https://%cpm_hostname%/ in our example using
https:// ec2-35-161-178-196.us-west-2.compute.amazonaws.com
Please hit the Advanced button.
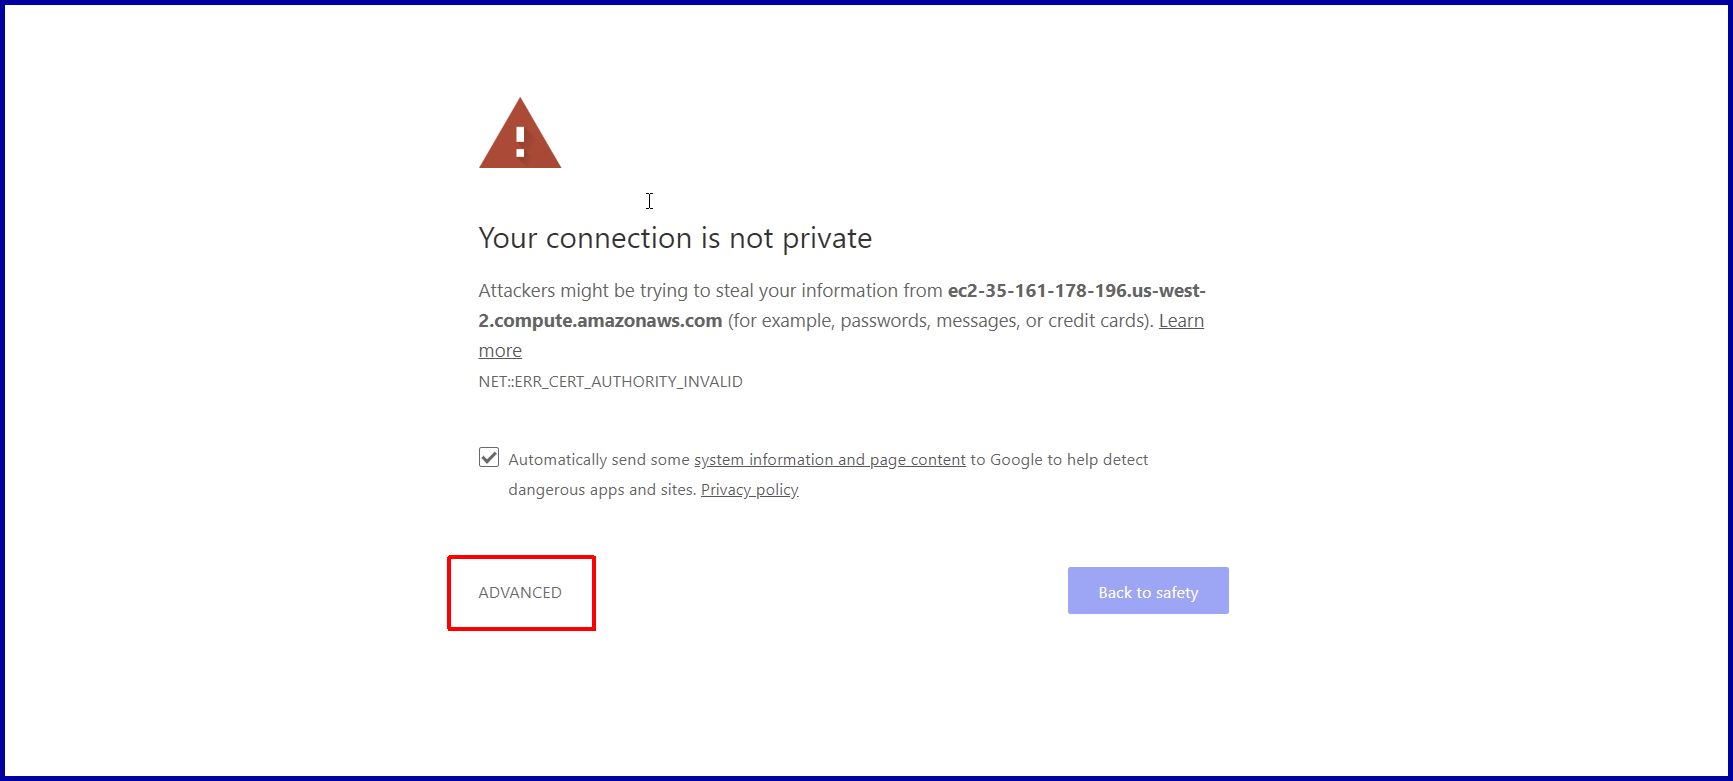
Note: This warning can be safely ignored as we are using a self-signed SSL Certificate.
Note: You should add an exception to the browser to avoid this message in the future.
Step 17. Please locate the Instance id of the newly launched CPM instance in the EC2 Console under properties and enter it into the field.
Step 18. Please click on Next Button.
Step 19. Please read and accept the licensing terms and click on the Next Button.
Step 20. Please select under the license selection: “this account is already licensed” for the BYOL edition.
Under the username field enter the CPM Admin/Root account name and enter the password and confirm that user’s password. Email field is optional.
Step 21.
Please enter the correct information in the following fields:
Enter the correct time zone in the Choose Time field, for where your CPM Instance resides.
Under Choose New or Existing: IMPORTANT! Choose "Use existing Data Volume" and select in the dropdown menu the old CPMDATA volume.
AWS Authentication: Choose the correct method of connecting to AWS, the choices are Use Instance’s IAM Role or “type credentials”. If you choose the later, you will be prompted for the AWS Access Key and AWS Secret key. If applicable you can select Connect via Web Proxy .if enabled you will have to enter the Proxy Port, Proxy User, and the Proxy Password.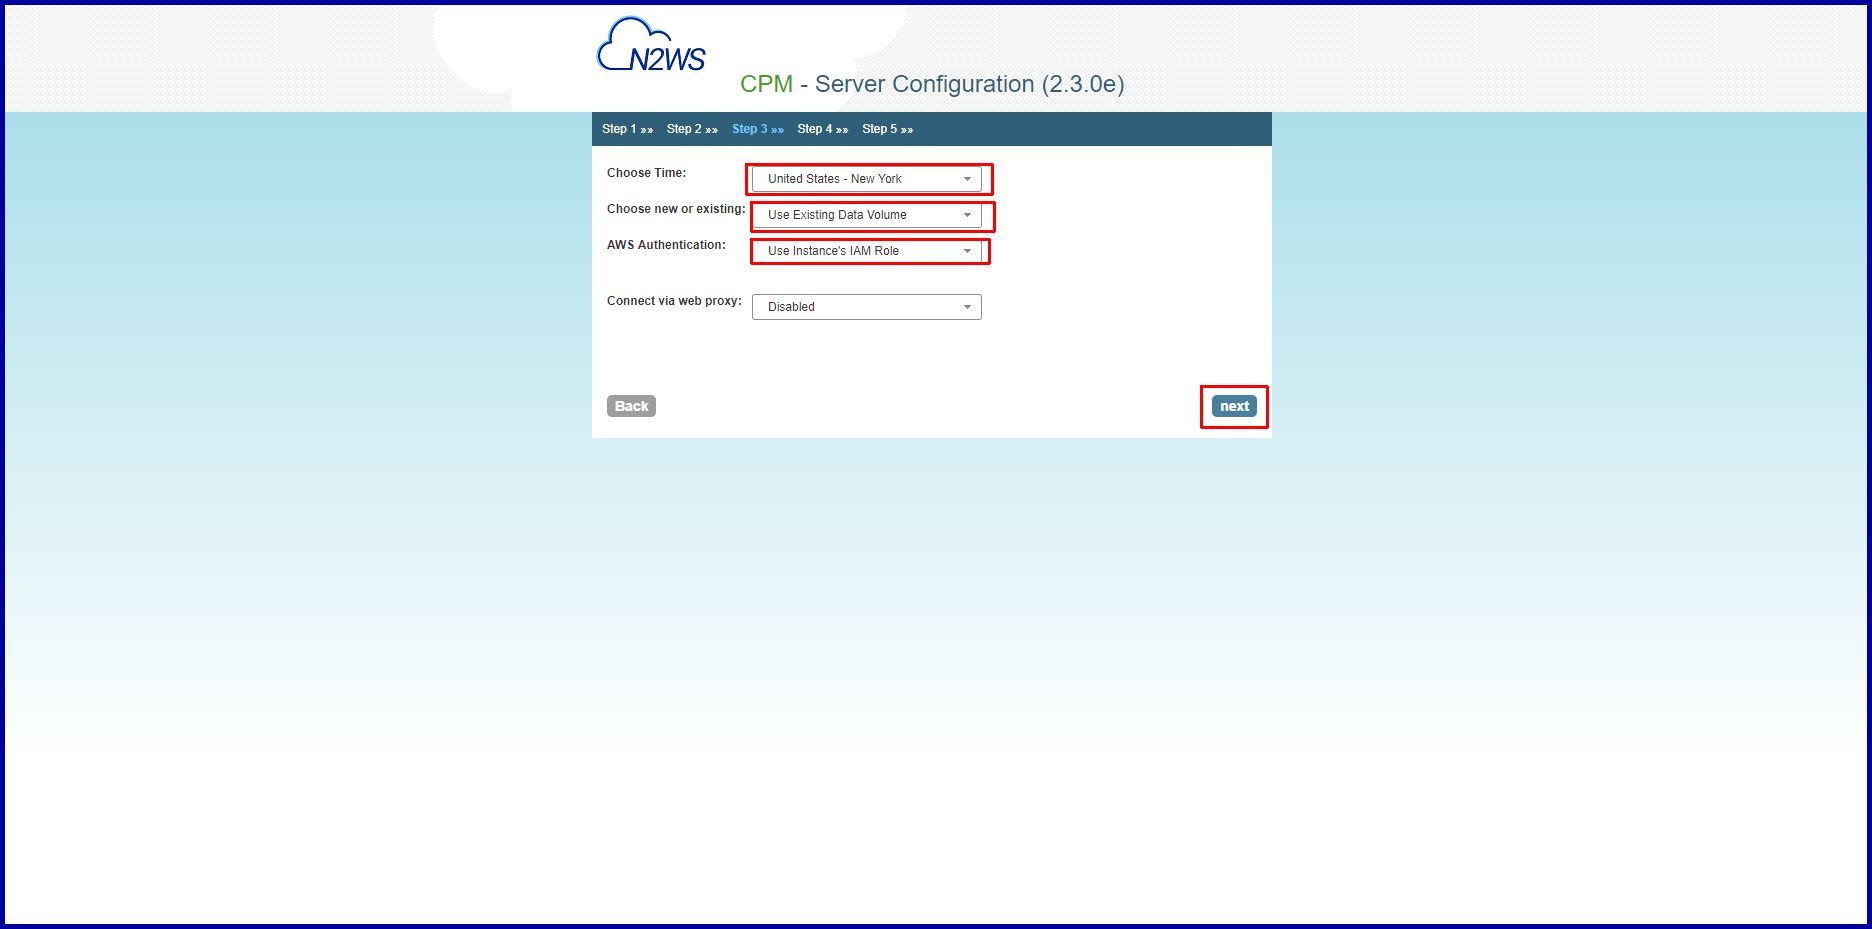
NOTE: If you receive an Error after clicking the Next button that says "Could not authenticate with AWS. Please do not use the IAM Role option unless an IAM role was assigned to the CPM instance", This is usually caused by entering an incorrect role or if there is no role assigned to the newly launched CPM instance. Please go to the EC2 console and right click on the CPM instance and select Instance Settings. Then choose the Attach /Replace IAM Role. assign the correct role to the instance then hit the Apply button and click on the Close button. Please go back to the CPM installation screen please press the Next button again.
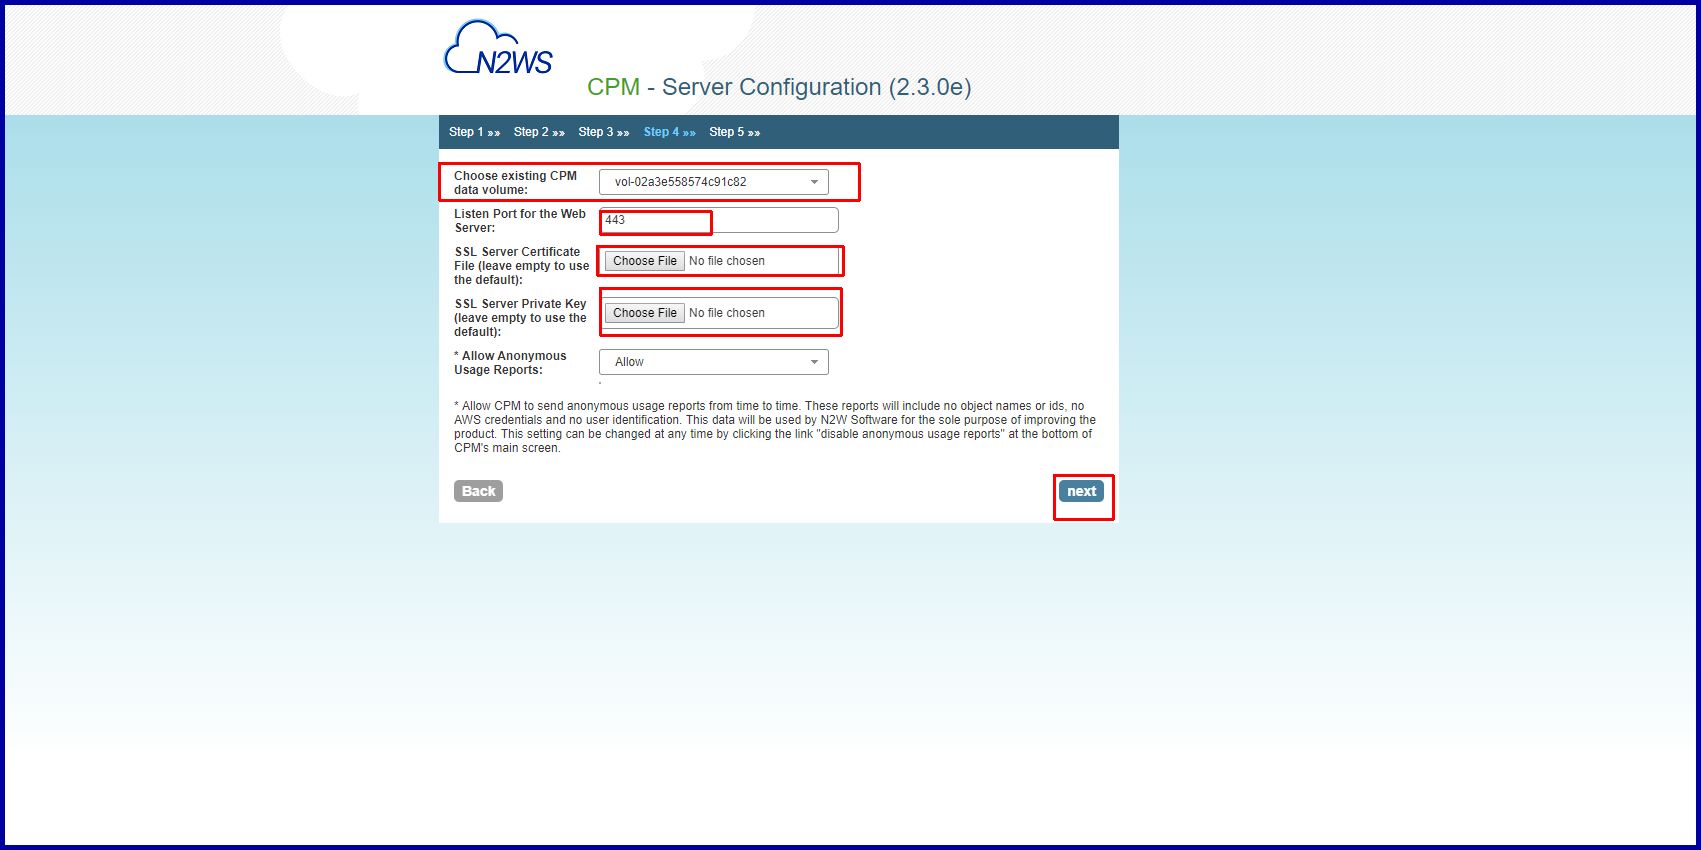
Step 22. Please enter the following fields:
Choose Existing CPM Data Volume:
Listen port for the Web Server: default is 443.
If you are using custom SSL Certificates and an SSL server Private key, please click on Choose File.
Step 23. On the Register this Account screen you can enter all the requested information or Click the checkbox next to I don’t want to register now, maybe later and click on the Configure System button.
You will get an installation progress screen
When that completes you will receive a CPM was Configured Successfully splash screen and you can select the Click here to start Using CPM.
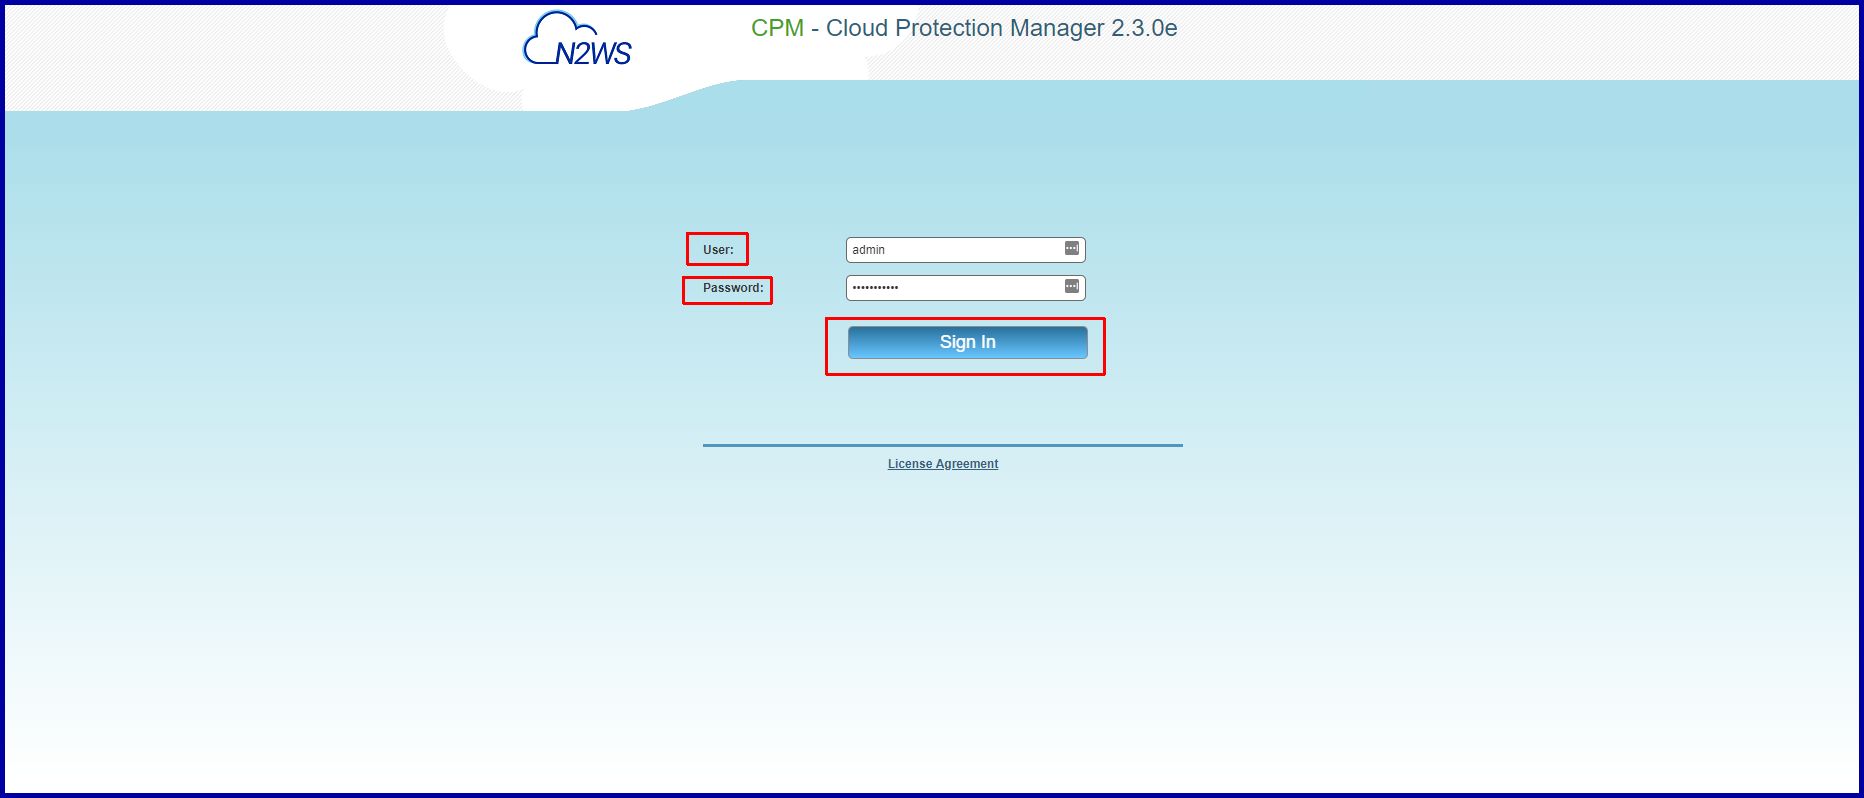
Step 24. Please login to the CPM Manager using the admin/root account and password you entered in step 20 and press the Sign In button.
This will take you into the Manager screen where you can see that all settings were carried over from the CPM data volume and you can continue as before.
Important: If you are using backup scripts that utilize SSH, you may need to login to the CPM Server once and run the scripts manually,
so the use of the private key will be approved.